
Assuming you’re tired of googling how to record Facetime and Skype approaches Mac, you’ve come to the right places. In this article, you will take a look at the best Skype and Facetime call recording apps for Mac available today. Before you try one of the recorded call recorders, check whether it is legitimate to record FaceTime and Skype in your country. FaceTime has changed the way we use our cell phones to talk to each other. Since the introduction of the iOS feature, users have observed numerous applications for FaceTime calls for business, educational and entertainment purposes. Some work is needed to explore the distinctive interfaces of the devices.
Why you need to record Facetime and Skype calls?
Have you ever imagined that your smile can go further and further when you smile on your iPhone or computer? You can do it with the help of FaceTime. FaceTime is a videophone application designed by Apple Inc. for its products. Facetime is famous for its convenience, simplicity, efficiency, and high-quality video. Almost all Apple users use FaceTime to communicate with their friends or family. Our complete guide on how to record a FaceTime call will walk you through how to capture a session on any iOS device. You should record FaceTime with sound on Macintosh to safeguard precious minutes with your loved ones. You may also need it to record a FaceTime meeting for business purposes. FaceTime has been offering this amazing voice and video decision support to iOS and Mac clients.
FaceTime gives iOS and Mac users a great way to stay in touch with the people who matter to them. It is free to use, no additional installation or third party app is required. Finding the best FaceTime and Skype call recorder for Mac can be essential in many ways. For example, you may need to record a Skype interview or meeting for future reference or share with a colleague. Fortunately, both Skype and FaceTime come with built-in call recording capabilities. But learning how to use a FaceTime or Skype recorder on Mac requires some teaching first. If you are looking to record a FaceTime call on your iPhone, you can use its built-in screen recording feature. You may already know that QuickTime Player on Mac can record screen videos from connected iOS devices. Since you can record your screen natively on your iPhone, you don’t need a Mac for this.
Best FaceTime and Skype Call Recorder Software for Windows and Mac 2023
With the most recent update in the form of Mac, several items have been changed. We examined the method in the most proficient method to record FaceTime screen with sound. Another easier method to record both FaceTime and Skype on Mac is to use Wondershare DemoCreator. Recording a Skype business call or FaceTime meeting is almost certainly considerably more advantageous than taking notes during a digital discussion. Call recording saves us time and energy and helps us focus on the subtleties of the other party’s speech instead of taking notes. Whether it’s a Skype call or a FaceTime conversation, the DemoCreator instrument will record it for you.
Capturing a video call to save significant minutes is an effective way to use screen recorder for PC. DemoCreator is the generalized screen recorder to capture the video and sound and make picture-in-picture video usefully. It’s incredibly simple programming to capture video calls and zoom in on the sound work area. With this product, you will stop thinking about how to record FaceTime and Skype comes closer to Macintosh. Unlike most professional desktop call recorders, Wondershare DemoCreator is very easy to use and comes with plenty of customization options. It allows you to record calls using an internal/external microphone at the same time as setting up a results speaker. In addition, you can use the sound converter to package, cut and convert your voice calls to an alternative organization.
How to record Facetime video and audio with DemoCreator on Windows/Mac?
The app gets perfect records of FaceTime discussions in crystal clear HD. Call recording, the tool allows you to share your calls and convert them into MP3 files and even web-ready videos for Vimeo and YouTube. With DemoCreator FaceTime recording app, it will even alter and split your calls when you hang up. With the screen recorder for Windows to capture your call, you can get perfect accounts of your FaceTime visits, digital broadcasts and meetings, exactly as you see them, or in our amazing partial screen and side-by-side modes. Everything in completely clear HD. You can capture the video with a frame and microphone sound. However, FaceTime can be recorded on macOS, which DemoCreator fully supports.
Step 1: Launch Facetime and DemoCreator simultaneously
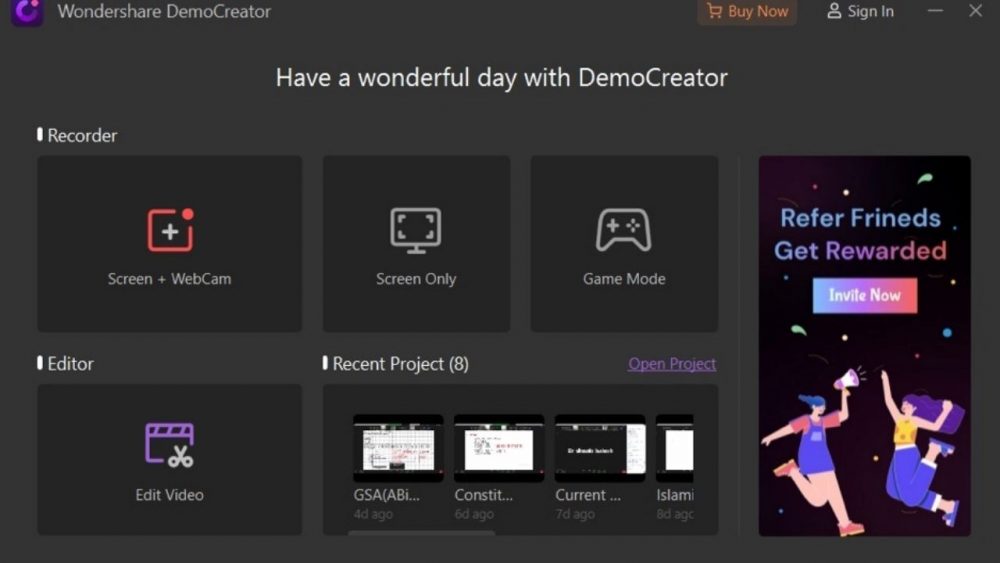
Start by installing and then launching Wondershare DemoCreator Facetime screen recorder. From the home interface, select New Recording. The start of the DemoCreator recording UI is as follows:
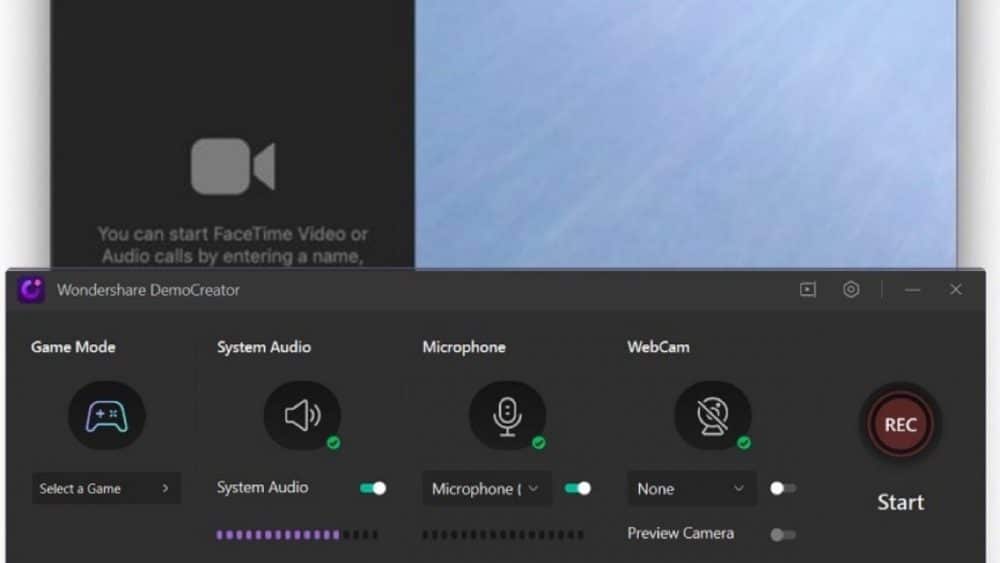
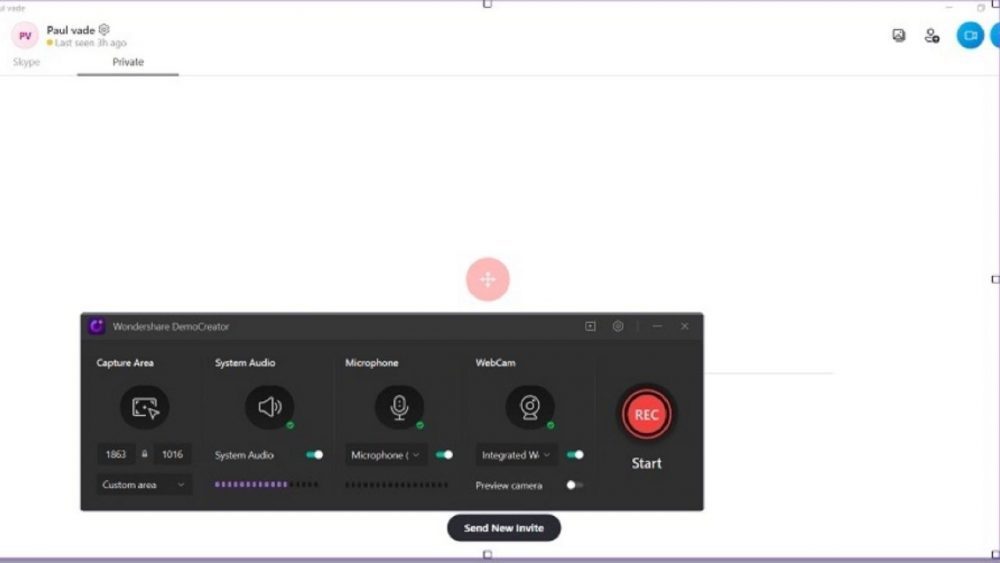
Step 2 – Set up your Facetime screen
With Wondershare DemoCreator screen recorder, you can also perform Facetime screen recording. You can customize your web screen to the extent you want. From webcams to audio microphone, you can do it all. To do that, press the desired function, you can place the main part of the Facetime recording interface as follows:
Step 3 – Enabling the Personalization Toolkit
Sometimes while recording the tutorial screen, you need to perform actions in real time so that you can clearly explain your live actions to your audience. To do that with the DemoCreator screen recorder, simply opt for the Screen Drawing Tool slider available at the bottom of the screen recording window as follows:
You can also enable the PIP toolkit in the video editor by dragging the video to the timeline. Then drag your recorded Facetime footage onto the track above the video.
Step 4 – Export and Share to YouTube
To save and export your Facetime video with this software, here is how you can do it by simply pressing the Export button on the top right corner of the screen as follows:
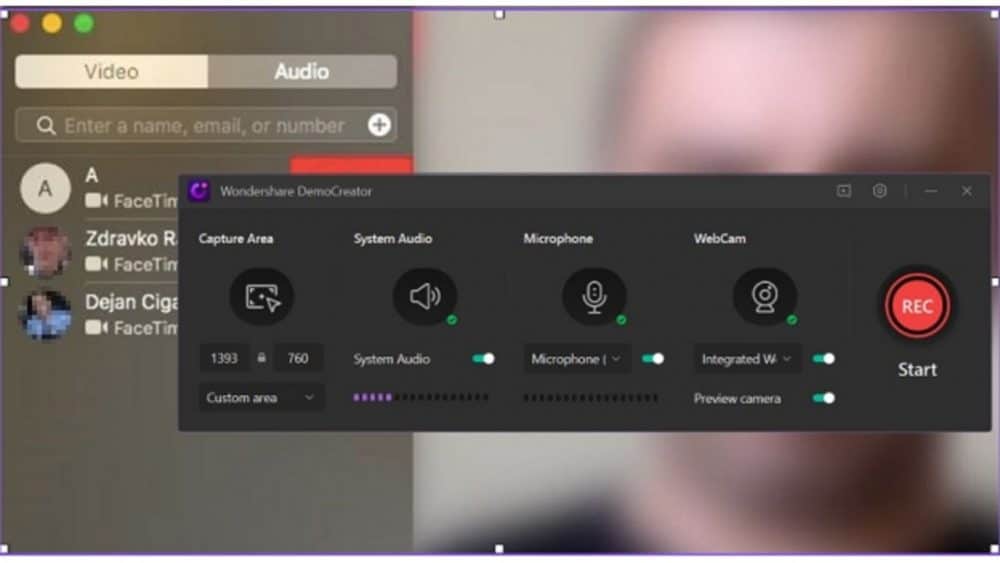
How to record Skype calls and audio with DemoCreator on Windows/Mac?
Assuming you’re one of the many people who telecommute, you probably receive a lot of phone calls during work each week. Also, sometimes it’s hard to keep track of what everyone is saying and what tasks need to be done. Assuming you are looking for a device that can help you capture Skype call recordings with sound on PC, you should try Wondershare DemoCreator. Skype is one of the video conferencing applications that is very famous by some who think that it is allowed to use. After downloading the app on your Mac and making a registration, you can track your contacts and cancel. This is the way to record those calls you want to take while meeting virtually.
Steps to record Skype calls with DemoCreator
Step 1: Launch DemoCreator
In the most important step, you have to launch it from your desktop by typing the name of the software and opening the launcher from there.
 Step 2Open Skype and DemoCreator Screen Recorder
 Step 2Open Skype and DemoCreator Screen Recorder
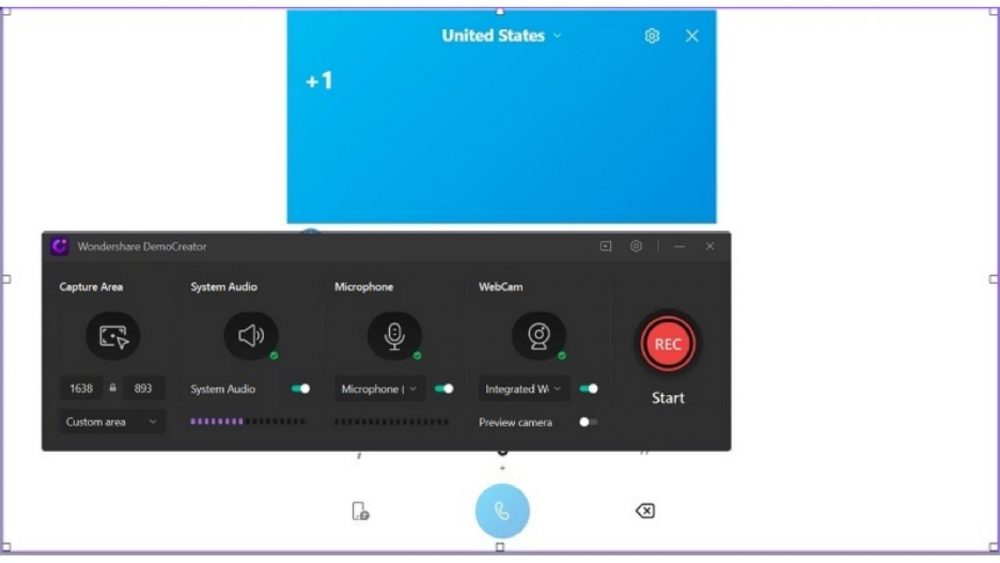
In the next step, you need to open the recorder of this software, and to do so, press the Start New Recording button from the start windows and start the Skype call as follows:
Step 3: Customize the recording screen
 Step 3: Customize the recording screen
Here you can customize your screen to be recorded. It includes several options for you to choose from before you start recording your screen. You can select the recording area, customize the screen dimension, include webcam recording, select an audio recording and much more from this window.
Step 4: Start recording
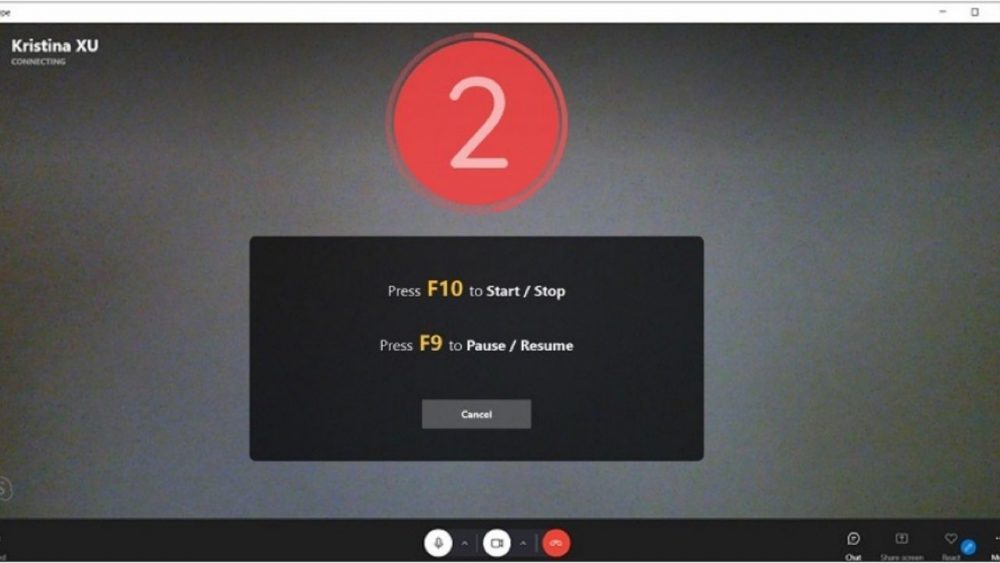
In the final step, when your Skype call is in action, press the red circle button which will finally start your screen recording.
Step 5 – Export Skype Calls
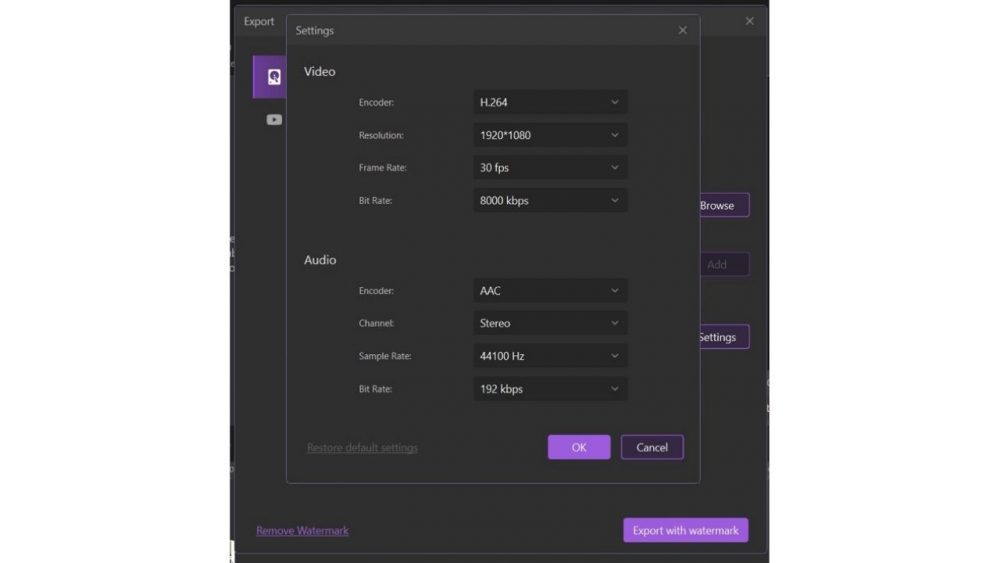
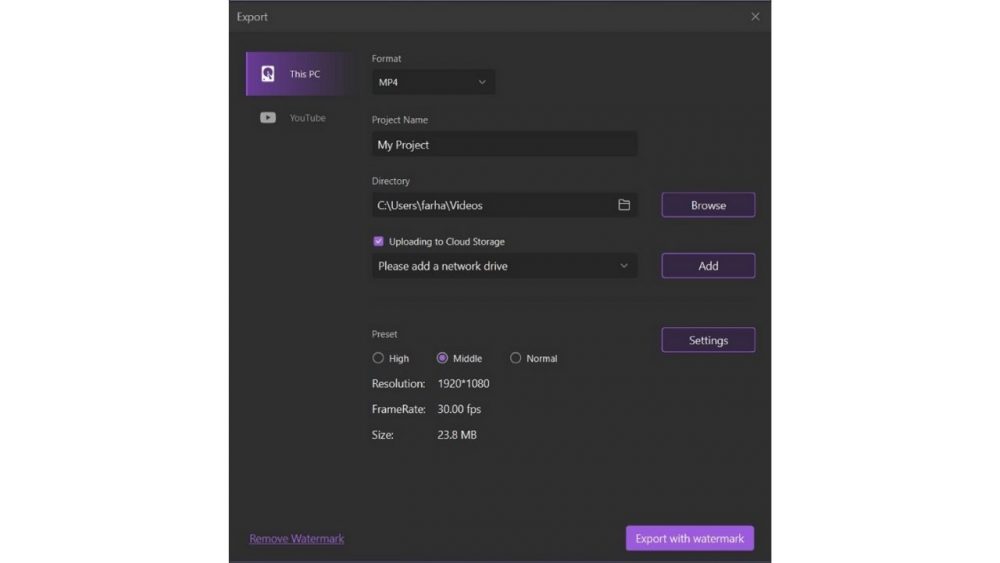
In the last step, you need to save your screen recordings in the desired format so that you can have them on your system, besides that, you can also share them on YouTube so that you can share them directly with your audience. So, to get started with the export, you need to click the Export button at the top right corner of the screen as follows:
From there, you can give your recordings whatever name you want, as well as your own format. Also, you can set up your own audio encoder within that Export window. Also, if you want to share your Skype calls directly to YouTube, you can do so seamlessly by simply clicking the YouTube menu bar from the Export window.
Not only capture the entire screen with sound, DemoCreator Screen Recorder can also capture the sound call without any scene so to speak. So you can save the ambient sound of MV and movie, and handle music from Spotify, SoundCloud, Pandora, etc. This recorder can record any activity that is happening on your screen. Whether you need to record a meeting, a meeting, an online class, or a video call, it can meet your needs. Also, as long as you have DemoCreator, it’s easy to record FaceTime, Skype, WhatsApp, Viber, Messenger, Google Hangout, Google Meet, Zoom, WebEx, Any Meeting, etc. without any problem.

Subscribe to our latest newsletter
To read our exclusive content, sign up now. $5/month, $50/year
Categories: Technology
Source: vtt.edu.vn