Social media is all about sharing photos and videos. Instagram is among the most popular social media platforms and introduced its feature ‘Reels’ in 2020. However, it has gone through several changes, and you may find some users asking, “how to make a reel on Instagram that holds the ability to attract an audience?”
View this post on Instagram
According to Statista, Instagram had 1.21 billion monthly active users in 2021, and you can expect at least 1.44 billion monthly active users by 2025. While some may already know the benefit of advertising on Instagram, with Reels, you get a one-stop solution to promote your brand, increase your audience base, and simply boost engagement.
If you’re also wondering how to make an Instagram reel and use it for your account growth, this write-up will introduce you to the concept of Reels, how to create them, and some tips to extend your reach.
So, without any further ado, let’s find out what Instagram Reels are.
What are Instagram Reels?
Reels are short video clips that you can create and share with your followers. You can also share these short clips made by other users/creators with others. There’s a built-in camera on the app itself that you can use, or you can also upload an existing video to the Reels section.
Moreover, the duration of a clip is 15 to 90 seconds, in which you can add music of your choice and make other edits. Once you post one, Instagram will automatically suggest it to an audience with similar interests.
Creating Reels opens up an opportunity to go viral, and if not, they can help in increasing followers or creating brand awareness. So, if you don’t know yet, you must find the answer to “how to make Reels on Instagram” and start focusing on growing your account.
So, how do you make a reel on Instagram? Let’s find out!
How to Make an Instagram Reel: Steps You Need to Follow
Before you proceed further with how to make Instagram Reels, you must know a thing or two about creating them. For instance, you should know that they are shortly timed, but they require time, skill, and effort. If you’re a beginner, all you need is a smartphone with a decent camera, and you’re good to go.
So, you need to follow these steps to create a Reel as a first-timer:
Step 1: Open Instagram, tap the Reels icon at the bottom to go to the Reels section, and then tap the camera icon on the top right of the clip.
![]()
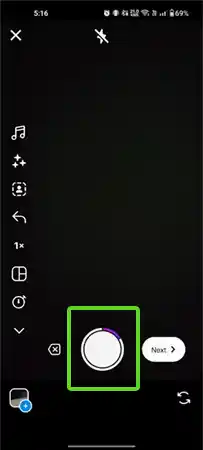
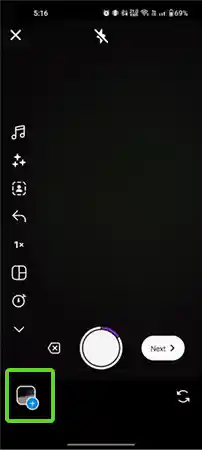
Step 2: Tap and hold the recording button to record a video in a single stream, or upload an existing video from your phone’s storage from the ‘+’ icon.
Step 3: Tap Next and add any effects you like that appear at the top.
Step 4: Tap Next and add a caption.
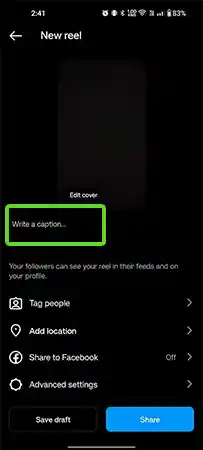
Step 5: Tap Share to post the clip.
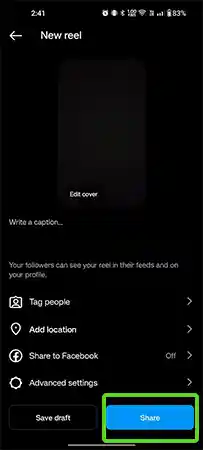
So, these are the steps you need to take to create a Reel and share it to the feed. However, you can experiment a lot with the process and work a bit more to reach a wider set of audience on Instagram.
How to Make Instagram Reels to Extend Your Reach
Instagram Reels are used by influencers and business owners to succeed on Instagram. If you also want to increase engagement, you can follow these steps to create it:
Create the Strategy
First, you need to create a strategy that includes your primary goal and the type of audience you’ll target. Figure out why you need to create these short clips – for increasing your followers, promoting a product, or boosting engagement.

Then, come up with a topic that caters to a specific type of audience. You can choose any trending topic like fashion, fitness, adventure, photography, education, comedy, and more. Once you figure out the topic and have a goal in mind, you only need the answer to how to create Reels on Instagram.
Moreover, creating an Instagram Reel involves the use of various tools. So, it is better to have some knowledge about them before you start the recording process.
Know the Tools
Before you begin the recording part, you must know about the tools available. You’ll see these tools on the left and scroll down to see them all.
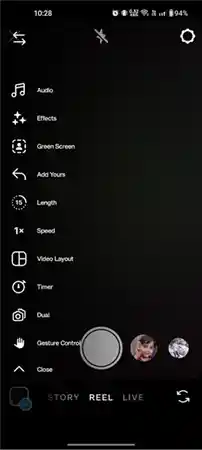
That said, here’s what they do:
- Audio: The music icon on the left is to add audio to your Reel. You can choose from the list of songs Instagram offers, or upload your own audio.
- Effects: The sparkle icon is for the “effects or filters” you can add to your Reel.
- Green Screen: The Green Screen creates a virtual background in which you can superimpose yourself.
- Add Yours: Add Yours is a sticker that you can add to your Reel that allows the viewers to share their responses.
- Length: You can choose how long your clip would be if you’re directly recording it from the Reels camera.
- Speed: The Speed tool allows you to speed up your Reel or slow it down. You can also add a boomerang effect to it.
- Video Layout: With Video Layout, you can add multiple videos to your Instagram Reel and make a single video.
- Timer: The Timer tool helps you decide the length of your Reel. It can be 15 to 90 seconds long as mentioned earlier.
- Dual: The Dual feature helps you record a video using your front and rear camera. It results in a reaction-type video in which the clip recorded by the rear camera takes up most of the space and the clip recorded by the front camera appears in a Window form.
- Gesture Control: With the Gesture Control feature, you just have to raise your hand and the recording begins.
After learning about the tools, it’s time to open the Reel section.
Open the Instagram Reel Section
Apart from the method mentioned earlier, there are two other easy ways through which you can go to the Reels section, and record one for yourself.
1) From the Home Page
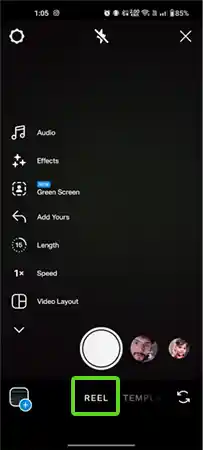
So, now we have “How to create an Instagram Reel from the Instagram homepage?” You need to tap the “+” icon present at the bottom of the homepage, and then tap “REEL” that you’ll see after scrolling a bit to the right.
![]()
2) From the Instagram Stories Camera
To create a Reel from the Instagram Stories Camera, you just need to swipe left from the home screen, and the story camera will open. Then, you need to tap “Reel” present at the bottom.

So, after figuring out the strategy to create your first Instagram Reel and learning about the tools, you can learn to record one for yourself.
Record the Reel
When it comes to recording an Instagram Reel, you have two more options. As you can record it in a single stream, you can also create separate clips, or upload an existing video.
- How to Make an Instagram Reel Using an Existing Video
As a creator, you also have the option to make a Reel using an existing video or photo(s). Most users need to search for how to make a Reel on Instagram using an existing video.
There are no tricks to that, as you can simply add footage from the camera roll you recently recorded, and upload it as a Reel. All you need to do is tap the “+” icon at the bottom left.

- How to Make an Instagram Reel Using Separate Clips
Moreover, if you want to record separate clips, just press and hold the capture button to record the first one. Pause the recording and then tap it again to record another clip.
Once you record the video or upload one from the gallery, it’s time to edit it.
Editing and Adding Effects
If you haven’t done editing before, this is the time you finally try your luck as a video editor!
However, adding the audio and effects are the two major aspects of the Reel after you record the clip. So, how to make an IG reel with audio and effects in it? Let’s find out.
- Adding the Audio
You can add the audio from the beginning by tapping the music note icon on the left. Once you do that, you’ll see the list of songs you can add to your reel or import your own audio. To upload your own audio, tap import.
![]()
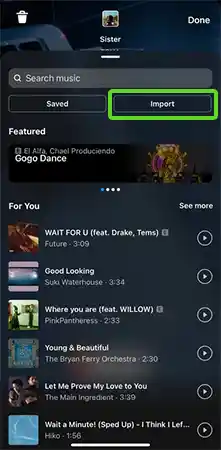
However, when it comes to making an Instagram Reel using trending audio, you have that option as well. While scrolling the feed, find a reel in which you see a little arrow alongside the name of the audio used.

After you select the audio, crop its length, and adjust the volume to fit the Reel. Then, add some effects.
- Adding the Effects
You will find the Effects option right below the music note icon you used to add audio to your Instagram Reel. Once you tap it, you’ll find multiple effects to add to your recorded clip.
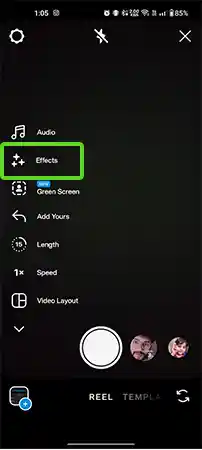
For example, in the picture below, you’ll see the “Doodle Heart” effect selected for the Reel.

So, after adding your favorite Effect and getting done with the audio, you can share or post the Reel.
Sharing/Posting the Reel
Now that you’re done with the recording and editing part of your Reel, it’s time to post it. Follow these steps:
Step 1: Tap the Next button present on the right after completing the recording and editing part.
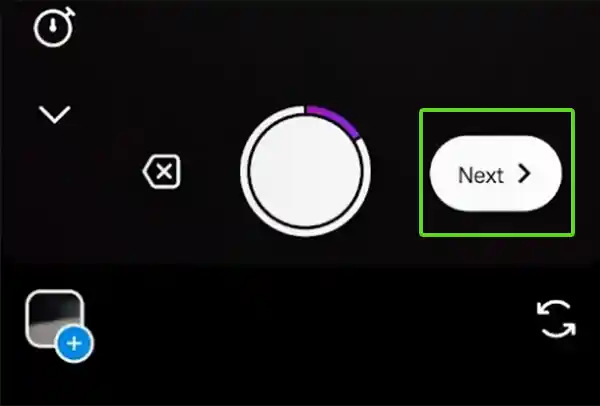
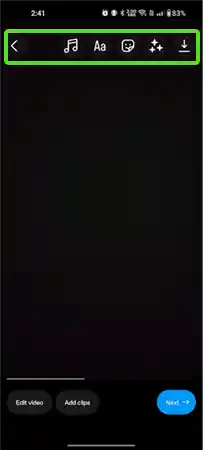
Step 2: As you tap the Next button, you’ll reach the preview part of your Reel. Right at the top, you’ll find the editing options (including those you’ve used already) – Audio, Text, Sticker, Draw, Effects, and Save. You can make any additions you like, or proceed to the next step by tapping the Next button on the right bottom to reach the final step.
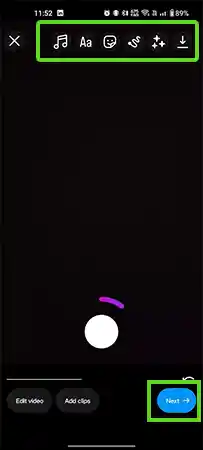
Step 3: Now, you’ve come to the final step of how to create an Instagram Reel, which is sharing it. Here, you can Edit the cover and choose one of the best Instagram captions to attract your audience.
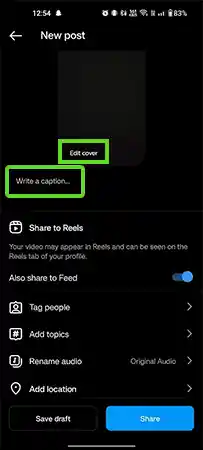
You can also tag people and even add topics to reach a specific set of audiences that share the same interest as you. It is also possible that one of your Reels goes viral, or your Instagram account gets verified and you get a blue tick!
Step 4: After adding the relevant information, you can either share the Reel or save it as a draft.

Saving the Reel as a draft is a better option if you’ll be making any further changes to it. However, if you’re sure about your creation, tap Share!
So, that’s how you create an Instagram reel and share it with your audience. However, there are other methods as well that you can consider while creating one.
Other Methods to Create Instagram Reels
What you’ve just gone through is the standard method to create Instagram Reels with original concepts. However, you can try other methods to create them.
1) Remix a Reel: While scrolling through Reels, it is possible that you may come across an inspiring one. You can add your own clip side by side or after the Reel with the help of the Remix option. To Remix a Reel, you just have to tap the three dots at the bottom right of the clip of your choice and tap the Remix button.
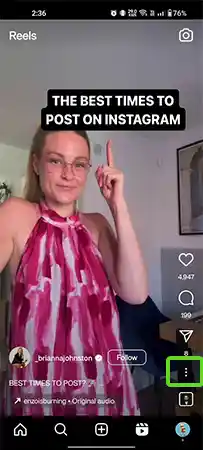
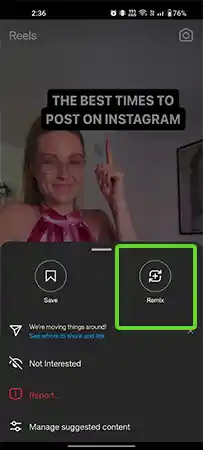
Then, you need to choose if you like your clip to run alongside the original video or come after it. Once you add your clip, share the Reel.
2) Use Templates: Using a Template allows you to take the whole concept of a creator’s Reel and replace the pictures with your own.
3) With Story Highlights: You can also create a Reel with the story highlights. Open any highlight from your Instagram handle and tap the Reels icon present at the bottom. Moreover, you need to add the music and then tap the Next button to finalize the editing.
![]()
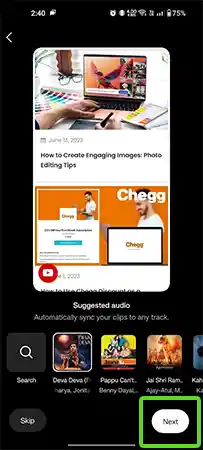
So, these are some other methods that can help you create a Reel. Instagram is full of successful creators, and you can take inspiration from any of them that you like. However, it is possible that you may encounter some issues and find Instagram Reels not working. In that case, just wait for a while, and try again. You can also learn some effective tips to boost engagement.
Some Effective Tips to Increase Reels Engagement
There’s no point in mindlessly posting numerous reels and expecting growth as a creator. In that case, you must keep the following tips in mind to increase the engagement factor.
- Focus on How You Begin
As a matter of fact, you get only 8 seconds to attract a viewer through an Instagram Reel. So, ensure that the beginning part is attractive enough to grab the viewer’s attention.
- Add the Entertainment Factor
You can only succeed as a creator if your content is entertaining or informative. However, you’ll be able to grasp a wider range of audiences if you can convey information with a touch of entertainment.
- Use Pop Music
Among all types, pop music has a higher tendency to go viral. So, you can also grab the viewer’s attention through good music used in your Reel.
- Add a Call to Action
If you’re promoting a brand or some product, always mention a call to action at the end. You can ask the viewers to follow you, click on a link in your bio, or visit some website.
- Follow Trends
You must keep an on the latest trends started by renowned creators and influencers. Whether it’s a dance challenge or some specific topic, you must incorporate them into your strategy.
So, keeping these tips in mind can play a vital part in making your Reels engaging and can also work if you’re searching for tips to grow your Instagram following.
Conclusion
Once you figure out how to create Reels on Instagram, you must focus on being consistent and keep an eye on the analytics. However, you may need some practice and create a ton of these short videos to grow your follower base. With the steps mentioned in this write-up, you can surely create the perfect Instagram Reel from scratch and connect with your audience.
Now, get your creativity to work, stick to your smartphone, and start creating content that boosts engagement.
FAQs
1. How long should a Reel be?
Ans: The ideal length of an Instagram Reel can be 60 seconds. But, if you’re creating one to be shared on Stories, keep it to 15 seconds only.
2. Is it possible to post Reels from a desktop?
Ans: No, this feature is not available right now, as you can only use your phone to post Reels.
3. How to download Instagram Reels?
Ans: To download a Reel created by you, you can simply save it from the download option available in the edit section.
Sources:
wikiHow: How to Create Reels on Instagram – Written by Kasey Dunn
Instagram: Introducing Instagram Reels
Read More
Author:
Gaurav Rathore
Bachelor In Science, University of Delhi
Categories: How to
Source: vtt.edu.vn
