Rubik’s Cube has been a popular puzzle game for decades, and it has become a symbol of intelligence and problem-solving skills. While solving the Rubik’s cube can be a challenging task, many enthusiasts have taken it to the next level by creating various patterns on the cube. These Rubik Cube patterns are not only visually appealing but also require a certain level of skill and knowledge to execute.
To create Rubik Cube patterns, one needs to understand the basics of the cube’s combination puzzle mechanics. The cube has six faces, each with a different color, and it can be twisted and turned in various directions to create different combinations. The goal is to manipulate the cube to create a specific pattern or design. Some patterns are simple, while others are more complex and require advanced techniques.
There are various resources available online that provide Rubik’s Cube enthusiasts with algorithms and step-by-step instructions to create different patterns. These resources also include online solvers and simulators that allow users to practice and experiment with different combinations.
Whether one is a beginner or an advanced player, creating Rubik Cube patterns can be a fun and challenging activity that enhances problem-solving skills and creativity.
Content Highlights
- The Rubik’s Cube has six faces; each face has a letter name, like R for right and U for up. You turn the faces clockwise or counterclockwise to solve the cube. Understanding the letters helps with solving.
- Algorithms are a series of specific moves you make to solve the cube. You need algorithms to solve the Rubik’s cube. It’s important to write the algorithms clearly and fully when sharing them.
- Some popular Rubik Cube patterns are the checkerboard, cube in a cube, and six-spot patterns. You can follow specific algorithms, step-by-step, to create these fun patterns.
- More advanced patterns, like the Superflip and Python patterns, are very challenging to make. They require lots of practice and patience to master the complex algorithms needed.
- You can make art and creative designs with Rubik Cube patterns. You can also compete in contests locally or globally to show off your problem-solving skills. Follow instructions or create your patterns and designs.
Basics of Rubik’s Cube Notation
Rubik’s cube notation is a set of symbols used to describe the movements of the cube. Understanding notation is crucial to solving the Rubik’s cube, as it allows you to communicate and understand algorithms.
Understanding Notation
| Move | Notation |
|---|---|
| Left | L |
| Right | R |
| Up | U |
| Down | D |
| Front | F |
| Back | B |
Each of the six faces of the Rubik’s Cube corresponds to a letter: R (right), L (left), U (up), D (down), F (front), and B (back). These letters indicate which face you are turning, and the apostrophe (‘) after each letter denotes the direction of the turn, which is “turn the face counterclockwise.”
For example, R’ means “turn the right face counterclockwise,” while U means “turn the top face clockwise.” You can also turn two faces at once by putting a number after the letter, indicating how many times to turn the face. For example, U2 means “turn the top face clockwise twice.”
Algorithm Notation
Algorithms are a series of moves used to solve the Rubik’s Cube. Each move is represented by a letter, and the algorithm is written as a series of letters separated by spaces. For example, the algorithm R U R’ U’ means “turn the right face clockwise, then the top face clockwise, then the right face counterclockwise, then the top face counterclockwise.”
When writing algorithms, it is important to use proper notation and to be clear and concise. Using abbreviations and shorthand can make algorithms difficult to understand, so it is best to use the full notation whenever possible.
Common Rubik Cube Patterns

Rubik’s Cube has been a popular toy for decades, and many people enjoy trying to solve it or create unique patterns on its surface. In this section, we will discuss some of the most common Rubik Cube patterns that people try to create.
Checkerboard Pattern

The checkerboard pattern is one of the most popular Rubik’s cube patterns. It involves creating a black-and-white checkerboard pattern on the cube’s surface. To create this pattern, you need to turn the cube in a specific way. The following table shows the moves required to create a checkerboard pattern on a Rubik’s cube:
- Turn the left face 90 degrees clockwise (L)
- Turn the right face 90 degrees clockwise (R)
- Turn the up face 90 degrees clockwise (U)
- Turn the down face 90 degrees clockwise (D)
- Turn the front face 90 degrees clockwise (F)
- Turn the back face 90 degrees clockwise (B)
- Turn the left face 90 degrees clockwise (L)
- Turn the right face 90 degrees clockwise (R)
Cube in a Cube Pattern
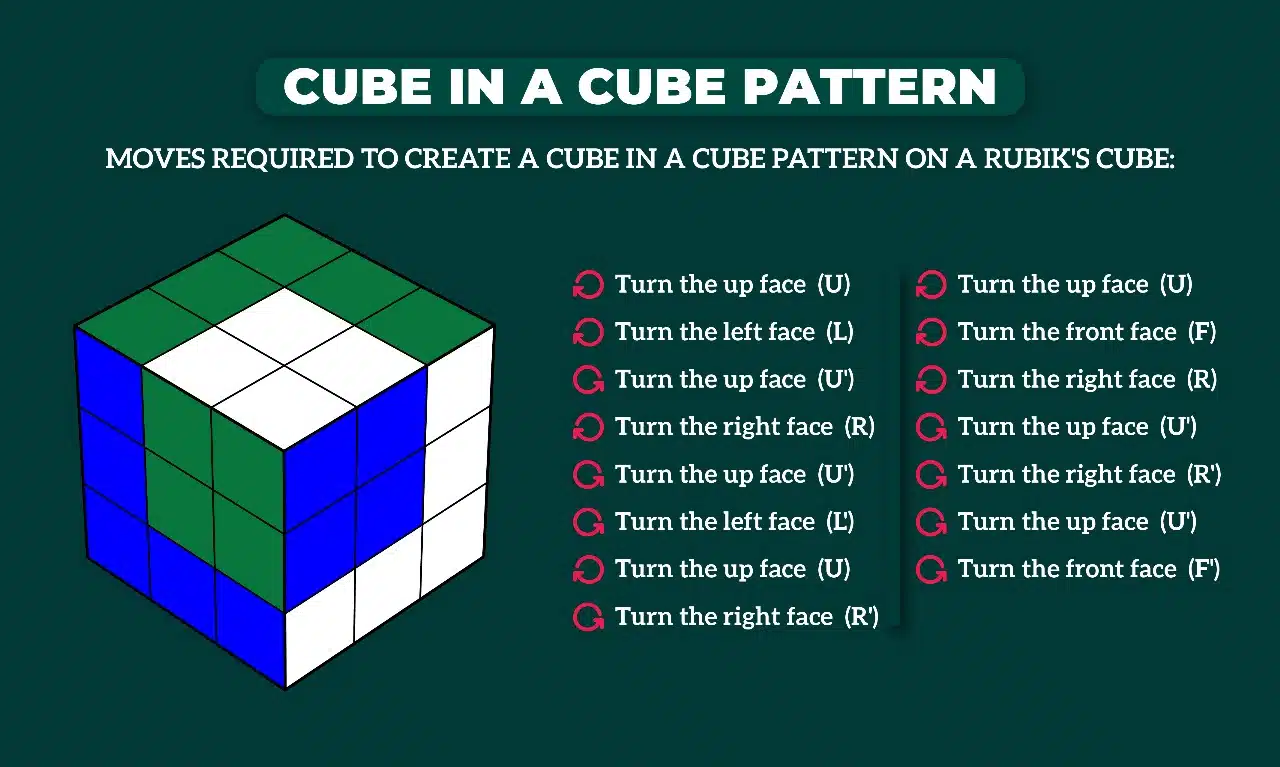
The cube in a cube pattern is another popular Rubik’s Cube pattern. It involves creating a smaller cube inside a larger cube on the cube’s surface. To create this pattern, you need to turn the cube in a specific way. The following table shows the moves required to create a cube in a cube pattern on a Rubik’s cube:
- Turn the up face 90 degrees clockwise (U)
- Turn the left face 90 degrees clockwise (L)
- Turn the up face 90 degrees counterclockwise (U’)
- Turn the right face 90 degrees clockwise (R)
- Turn the up face 90 degrees counterclockwise (U’)
- Turn the left face 90 degrees counterclockwise (L’)
- Turn the up face 90 degrees clockwise (U)
- Turn the right face 90 degrees counterclockwise (R’)
- Turn the up face 90 degrees clockwise (U)
- Turn the front face 90 degrees clockwise (F)
- Turn the right face 90 degrees clockwise (R)
- Turn the up face 90 degrees counterclockwise (U’)
- Turn the right face 90 degrees counterclockwise (R’)
- Turn the up face 90 degrees counterclockwise (U’)
- Turn the front face 90 degrees counterclockwise (F’)
Six-Spot Pattern

The six-spot pattern is another popular Rubik’s Cube pattern. It involves creating six spots of the same color on the cube’s surface. To create this pattern, you need to turn the cube in a specific way. The following table shows the moves required to create a six-spot pattern on a Rubik’s cube:
- Turn the up face 90 degrees clockwise (U)
- Turn the front face 90 degrees clockwise (F)
- Turn the right face 90 degrees clockwise (R)
- Turn the up face 90 degrees counterclockwise (U’)
- Turn the right face 90 degrees counterclockwise (R’)
- Turn the front face 90 degrees counterclockwise (F’)
Cube Explosion Pattern

The cube explosion pattern is a dynamic Rubik’s Cube design that gives the illusion of the cube bursting outward. To achieve this pattern, follow these moves:
- Turn the up face 90 degrees clockwise (U)
- Turn the right face 90 degrees clockwise (R)
- Turn the front face 90 degrees clockwise (F)
- Turn the up face 90 degrees counterclockwise (U’)
- Turn the right face 90 degrees counterclockwise (R’)
- Turn the front face 90 degrees counterclockwise (F’)
X-Mark Pattern

The X-mark pattern is a striking Rubik’s Cube design featuring a large “X” on the cube’s surface. To create this pattern, perform the following moves:
- Turn the up face 90 degrees clockwise (U)
- Turn the left face 90 degrees clockwise (L)
- Turn the right face 90 degrees clockwise (R)
- Turn the down face 90 degrees clockwise (D)
- Turn the left face 90 degrees counterclockwise (L’)
- Turn the right face 90 degrees counterclockwise (R’)
Advanced Patterns and Algorithms
[Video Credit: @Tingman]
For those who have mastered the basic Rubik Cube patterns, there are more advanced patterns and algorithms to explore. These advanced patterns require a higher level of skill and knowledge of algorithms. Here are some of the most impressive advanced Rubik’s cube patterns that you can try.
Superflip
The superflip is a pattern that involves flipping all of the edges of the Rubik’s cube while keeping the corners in their original positions. It is a challenging pattern that requires a lot of practice and patience. To achieve the superflip, you need to follow a specific algorithm that involves repeating a set of moves several times.
Anaconda and Black Mamba
The Anaconda and Black Mamba patterns are two of the most challenging patterns to achieve on the Rubik’s Cube. Both patterns involve twisting and turning the cube in a specific way while applying a set of algorithms. The Anaconda pattern involves twisting the cube in a snake-like pattern, while the Black Mamba pattern involves twisting the cube in a zig-zag pattern.
Python and Green Mamba
The Python and Green Mamba patterns are two of the most visually impressive patterns that you can achieve on the Rubik’s Cube. Both patterns involve twisting and turning the cube in a specific way while applying a set of algorithms.
The Python pattern involves twisting the cube in a snake-like pattern, similar to the Anaconda pattern. The Green Mamba pattern involves twisting the cube in a zig-zag pattern, similar to the Black Mamba pattern.
To achieve these patterns, you need to have a good understanding of algorithms and practice them repeatedly. It is important to note that these patterns are not easy to achieve and require a lot of patience and practice.
Pattern Creation Techniques
[Video Credits @ScoochCubing]
Creating patterns on a Rubik’s cube can be an exciting challenge for those who have already mastered the art of solving the cube. There are various techniques that one can use to create patterns on a Rubik’s cube. Here are two popular techniques that can be used to create different patterns on the cube.
Building Block Approach
The building block approach is a technique that involves creating a pattern by repeating a set of moves. This technique is especially useful for creating repeating patterns on the cube.
To create a pattern using the building block approach, the solver must first decide on a set of moves that will be repeated to create the pattern. The solver can then repeat the set of moves on different positions of the cube to create the desired pattern.
For example, a solver can create a pattern by repeating the moves “R U R’ U’” on different positions of the cube. This will create a repeating pattern that can be expanded to cover the entire cube.
Layer-by-Layer Method
The layer-by-layer method is a technique that involves creating a pattern on each layer of the cube. This technique is especially useful for creating complex patterns on the cube.
To create a pattern using the layer-by-layer method, the solver must first decide on a pattern that they want to create on each layer of the cube. The solver can then create the pattern on the first layer of the cube using any method they prefer, such as the building block approach or any other method.
Once the first layer is complete, the solver can move on to the second layer and create a pattern on that layer. This process can be repeated for each layer of the cube until the desired pattern is complete.
Using these techniques, one can create a wide variety of patterns on a Rubik’s Cube. Whether you prefer repeating patterns or complex patterns on each layer of the cube, there is a technique that can help you achieve your favorite pattern.
Solving Rubik’s Cube From Patterns
Solving a Rubik’s cube from patterns is a fun way to challenge yourself and improve your skills. This section will cover two key aspects of solving the Rubik’s Cube from patterns: reversing algorithms and converting patterns to a solved state.
Reversing Algorithms
To solve the Rubik’s cube from a pattern, you need to know how to reverse algorithms. An algorithm is a sequence of moves that you perform on the cube to achieve a specific pattern or solve a problem. Reversing an algorithm means performing the same sequence of moves in the opposite order to return the cube to its previous state.
There are many algorithms you can use to solve Rubik’s cube from patterns, such as the cross algorithm, fish pattern algorithm, and flower algorithm. To reverse an algorithm, you need to know the moves in the sequence and perform them in the opposite order. For example, if the algorithm is R U R’ U’, you would reverse it by performing U R’ U’ R.
Pattern to Solved State
Once you have reversed the algorithm, you can convert the pattern to a solved state. To do this, you need to know the correct sequence of moves to solve the cube. The sequence of moves for solving the Rubik’s cube is broken down into several stages, including solving the cross, corners, and edges.
To solve the cross, you need to align the centerpieces of each face with the corresponding edge pieces. This can be achieved using the cross algorithm and rotating the cube as necessary.
Next, you need to solve the corners by aligning them with the correct centerpieces. This can be achieved using the corner algorithm and rotating the cube as necessary.
Finally, you need to solve the edges by aligning them with the correct center and corner pieces. This can be achieved using the edge algorithm and rotating the cube as necessary.
Decorative and Artistic Patterns
Rubik’s Cube is not just a toy; it is also a medium for creating beautiful patterns. The cube’s six faces can be used to create a variety of stunning patterns that can be both decorative and artistic. This section will explore how to create and display decorative and artistic patterns on a Rubik’s cube.
Creating Art with Patterns
Creating art with Rubik’s cube patterns is a fun and creative way to express oneself. Many patterns can be created, such as the checkerboard pattern, the six-color cube in a cube pattern, and the fish pattern.
These patterns can be created using algorithms, which are a set of instructions that tell you how to move the cube to create the desired pattern. One popular pattern is the checkerboard pattern, which is created by alternating colors on adjacent sides of the cube. This pattern is simple to create and can be done using only a few moves.
Another popular pattern is the six-color cube in a cube pattern, which is created by creating a cube within a cube using different colors on each side. This pattern requires a bit more effort to create but can be very satisfying once completed.
The fish pattern is another popular pattern that can be created using algorithms. This pattern is created by making a series of moves that create a fish shape on one side of the cube. Once the fish shape is created, it can be mirrored on the opposite side of the cube to create a symmetrical pattern.
Displaying Patterns
Once a pattern has been created, it can be displayed in a variety of ways. One way to display a pattern is to simply hold the cube and show it to others. Another way to display a pattern is to take a photograph of the cube and share it on social media.
There are also specialized displays available that are designed specifically for displaying Rubik’s cube patterns. These displays can be used to showcase a pattern and are a great way to add a decorative touch to a room.
Challenges and Competitions
Rubik cube patterns are not only a fun way to pass the time, but they can also be used to compete against other cube enthusiasts. Competitions are held all over the world, and the World Cube Association (WCA) is the governing body that oversees them.
These competitions can range from local events to international championships, and they offer a chance for Cubers to showcase their skills and compete against others.
One of the most popular challenges in these competitions is the speedcubing challenge. This challenge involves solving the cube as quickly as possible, and various methods and techniques can be used to achieve faster times. Yusheng Du from China set the current record for a single solution in 2018, and it is 3.47 seconds.
Another popular challenge is the pattern challenge. This challenge involves creating specific patterns on the cube, such as stripes, lines, dots, or other designs. The patterns can be created on any of the cube’s faces, and they can range from simple to complex. There are many resources available online that provide algorithms and instructions for creating these patterns.
Competitions also offer a chance for cubers to showcase their ability to solve the cube blindfolded or with one hand. These challenges require a high level of skill and concentration, and they can be quite difficult to master.
In addition to the challenges, competitions also offer a chance for Cubers to meet other enthusiasts and share their love of the cube. They can exchange tips and tricks, and they can learn from each other’s experiences. Competitions can be a great way to build a community and connect with others who share a common interest.
Takeaway
Rubik Cube patterns are a great way to challenge yourself and show off your skills. With a little practice and patience, anyone can learn how to create impressive patterns on their cube.
Throughout this article, we have explored some of the most popular and stunning Rubik Cube patterns, as well as the algorithms and techniques required to create them. From the classic checkerboard to the intricate cube-in-a-cube, there is something for everyone to try.
Remember, the key to mastering Rubik Cube patterns is to start small and build your way up. Start with simple patterns and work your way up to more complex designs as you gain confidence and skill.
Whether you are a seasoned Rubik’s Cube solver or just starting, there is no limit to the amazing patterns you can create with this iconic puzzle. So grab your cube, get practicing, and see what stunning designs you can come up with!
Frequently Asked Questions (FAQs)
Let’s now explore typical inquiries related to Rubik’s cube patterns.
Categories: HOW TO
Source: tit.edu.vn