Listen to the Podcast:
Discord is a free online chat app that allows you to communicate with friends and other users through text, voice, and video. It is a popular platform for gamers, but it can also be used for various other purposes, such as collaborating on projects, discussing hobbies, or hanging out with friends. However, this article is all about how to create roles in Discord.
Roles are a way to organize and manage users on your Discord server. They can give users different permissions, such as banting or muting other users, creating and deleting channels, or changing the server’s settings. Roles can also give users different colors in chat, so it’s easy to see who has what permissions.
Without further ado, we will proceed to create roles in Discord. We are presenting a step-by-step easy to follow image guide here.
What are the Roles in Discord?
A role in Discord is a set of permissions that can be assigned to a user. Roles can be used to control what users can do on a server, such as creating channels, banning other users, or changing the server’s settings. Roles can also give users different colors in chat, so it’s easy to see who has what permissions.
There are two types of roles in Discord: default roles and custom roles. Discord creates default roles that cannot be modified. Server owners and administrators can create custom roles.
Benefits of Discord Roles
Discord roles are a way to organize and manage users on a Discord server. They can give users different permissions, such as speaking in voice channels, creating new channels, or banning other users. Roles can also give users different colors or icons, which can help identify them and make it easier to find them on a large server.
Here are some of the benefits of using Discord roles:
- Organization: Roles can organize users into different groups, such as moderators, administrators, and regular users. This can help to keep the server running smoothly and prevent chaos.
- Permissions: Roles can give users different permissions, such as the ability to speak in voice channels, create new channels, or ban other users. This can help to keep the server safe and secure.
- Identification: Roles can be used to give users different colors or icons, which can help to identify them and make it easier to find them on a large server. This can help find specific users or groups of users.
- Customization: Roles can be customized with different colors, icons, and permissions. This allows server owners to create a unique and personalized user experience.
Here are some examples of how Discord roles can be used:
- Moderators: Moderators can be given the ability to ban users, delete messages, and mute users. This can help to keep the server safe and prevent spam and harassment.
- Administrators: Administrators have the highest level of permissions on a server. They can do anything. A moderator can create new channels, add roles, and manage the server settings.
- Regular users: Regular users have the least permissions on a server. They can usually only speak in voice channels and create private messages.
How to Create Roles in Discord?
Here, we’ll walk you through adding new roles to your Discord server and assigning them to the appropriate users. Creating any role necessitates either your own Discord server or the ability to create roles as a server’s administrator.
How to Create Roles in Discord By Using Android App?
Here are the steps on how to create roles in Discord using the Android app:
- Open the Discord app on your Android device.
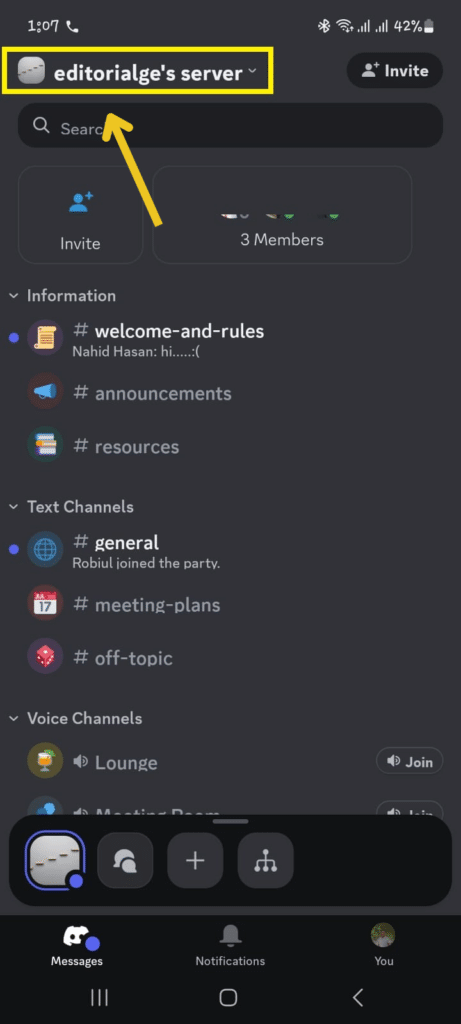
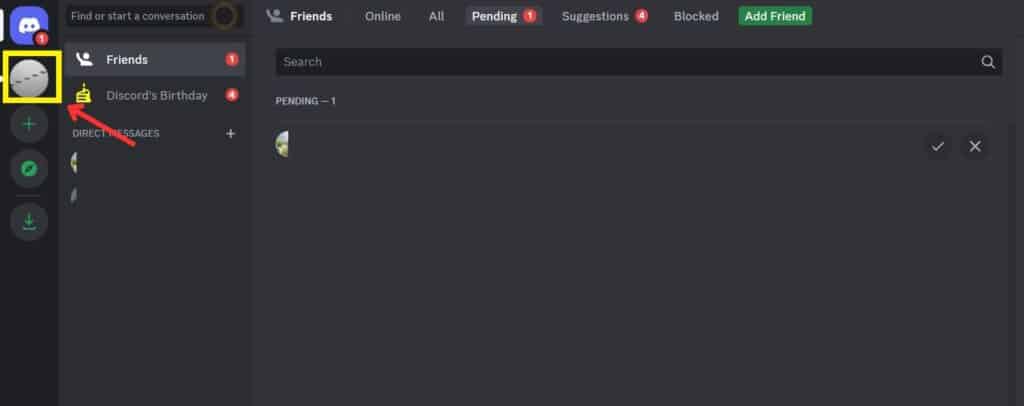
- Go to your server.
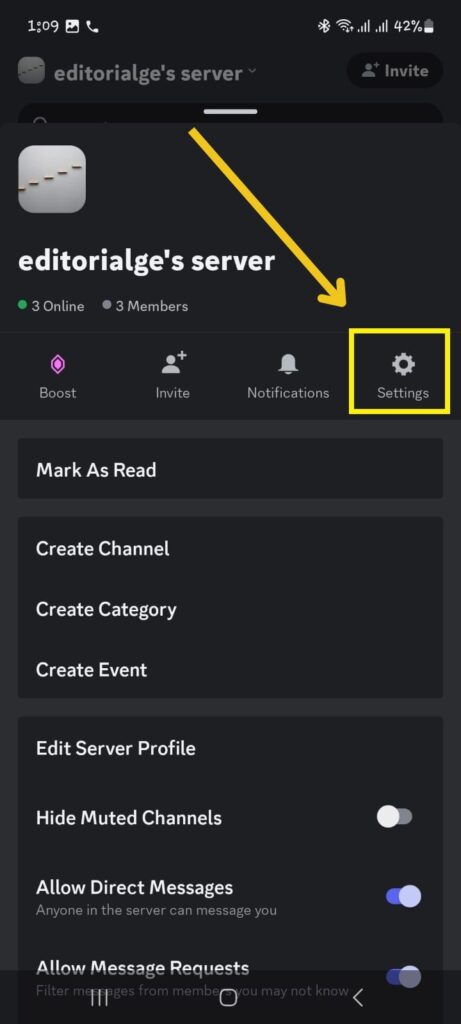
- Tap the server in the top left corner of the screen.
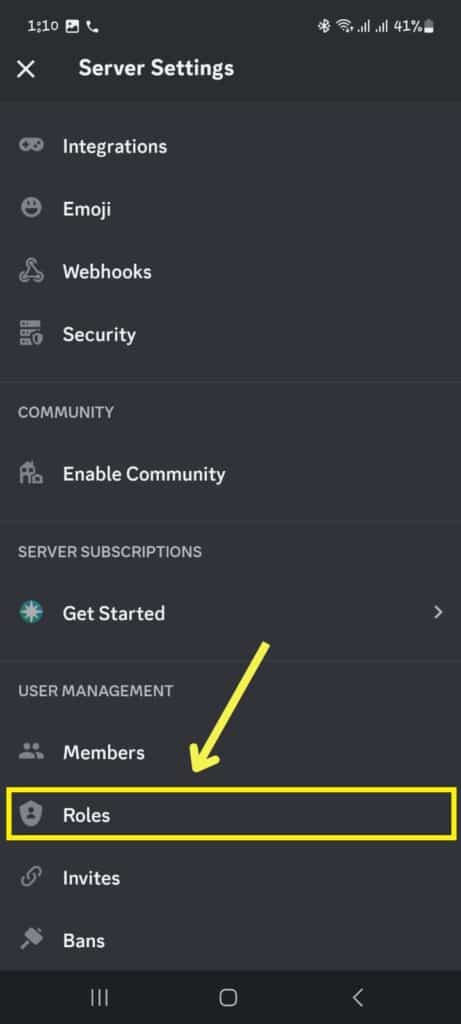
- Scroll down and select “Roles.”
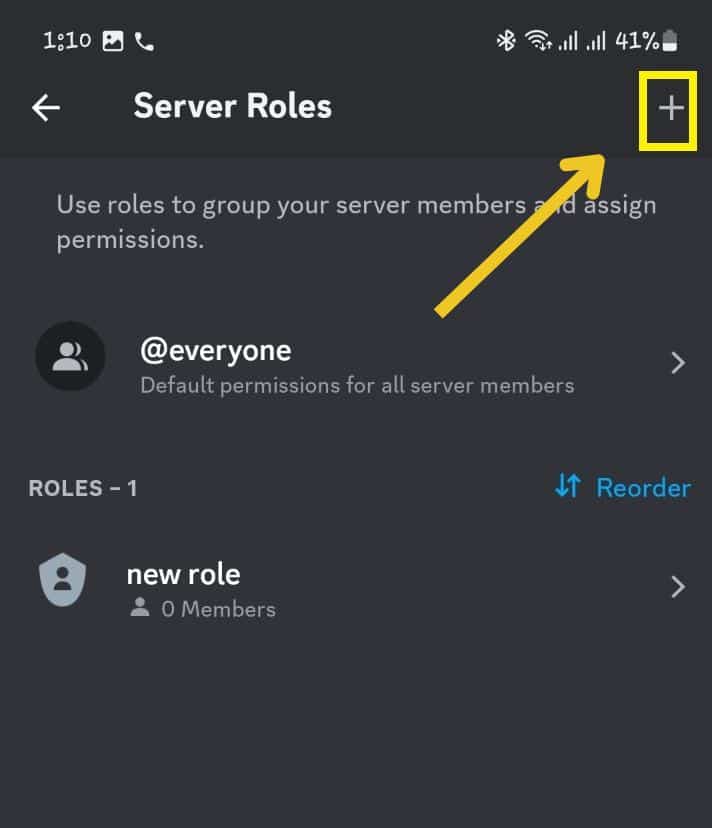
- Tap the “+” button in the bottom right corner of the screen.
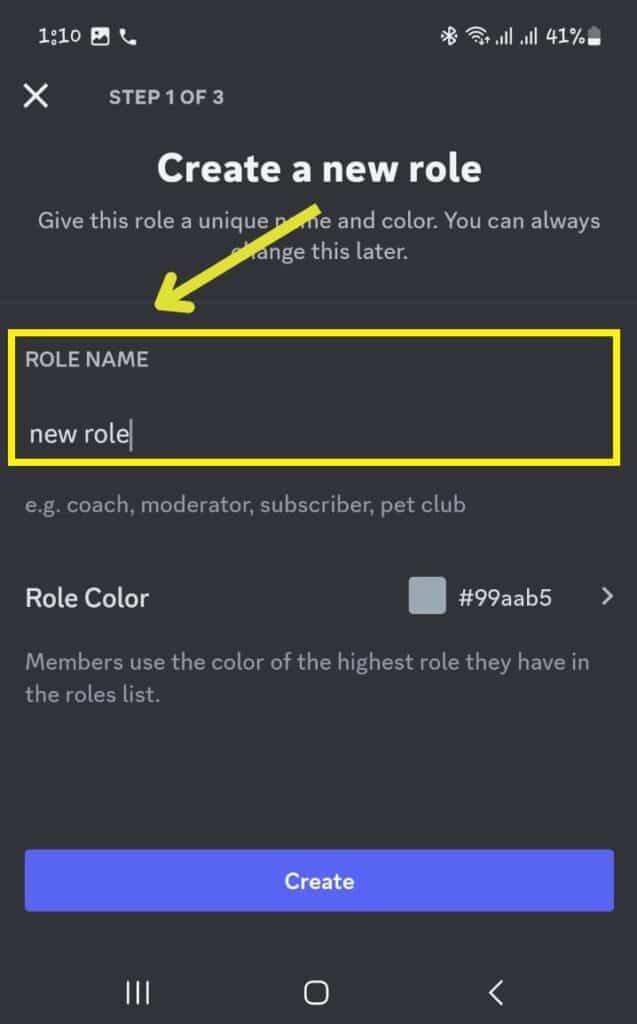
- Enter a name for your new role.
- (Optional) Choose a color for your new role.
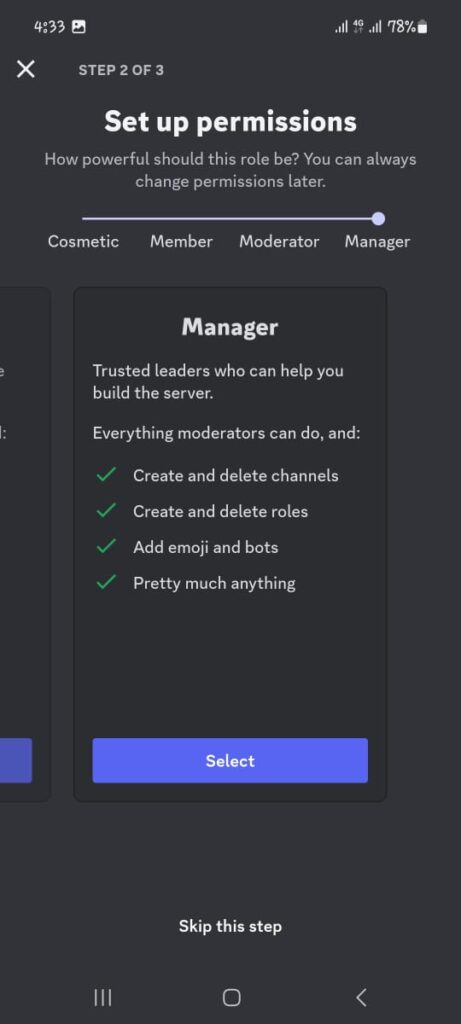
- (Optional) Select the permissions that you want to give your new role.
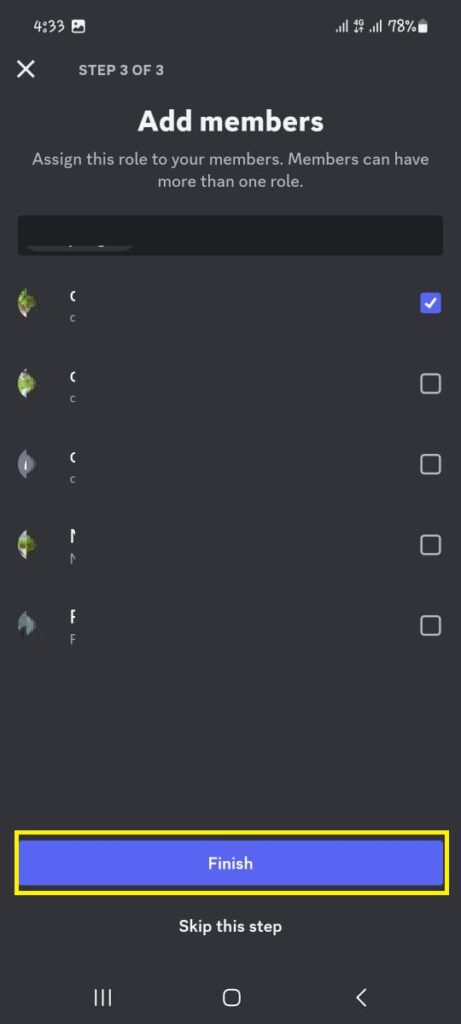
Your new role will now be created. You can assign it to users by going to the “Members” section of your server settings and selecting the user to whom you want to assign the role.
Here are some additional details about the steps above:
- Name: The name of your role is what will be displayed to users. Giving your roles descriptive names is a good idea so users know what they’re for.
- Color: The color of your role is purely cosmetic. It doesn’t have any impact on the role’s permissions.
- Permissions: The permissions you give your role determine what the role can do on your server. For example, you can give a role the permission to create channels, ban users, or kick users.
Related Pick: How to Integrate ChatGPT on Discord
How to Create Roles in Discord By Using iOS App?
Here are the steps on how to create roles in Discord using the iOS app:
- Open the Discord app and go to the server where you want to make the role.
- Tap on the server in the top left corner of the screen.
- Scroll down and tap on Roles.
- Tap on the Create Role button.
- Enter a name for the role.
- (Optional) Select a color for the role.
- (Optional) Set the permissions for the role.
- Tap on the Save button.
The role will now be created. You can assign the role to users by going to the Members tab and tapping the user’s name.
How to Create Roles in Discord By Using Linux?
To create roles in Discord by using Linux, follow these steps:
- Open Discord and log in to your account.
- Click on the server name in the left sidebar.
- Click on the “Server Settings” gear icon in the bottom right corner.
- Click on the “Roles” tab.
- Click on the “Create Role” button.
- Enter a name for the role.
- (Optional) Select a color for the role.
- (Optional) Select an icon for the role.
- Click on the “Create” button.
The role will be created and added to the list of roles on the “Roles” tab. You can then assign the role to users by clicking the “Manage Members” button next to the role.
How to Create Roles in Discord By Using Mac?
Here are the steps on how to create roles in Discord using a Mac:
- Open Discord and log in to your account.
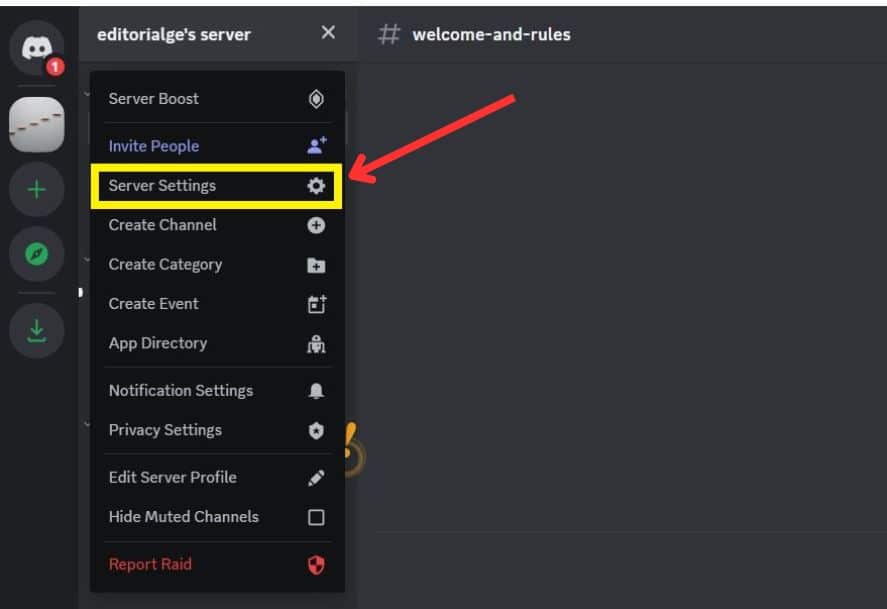
- Click on the server name in the top-left corner of the Discord window.
- Click on “Server Settings” in the menu that appears.
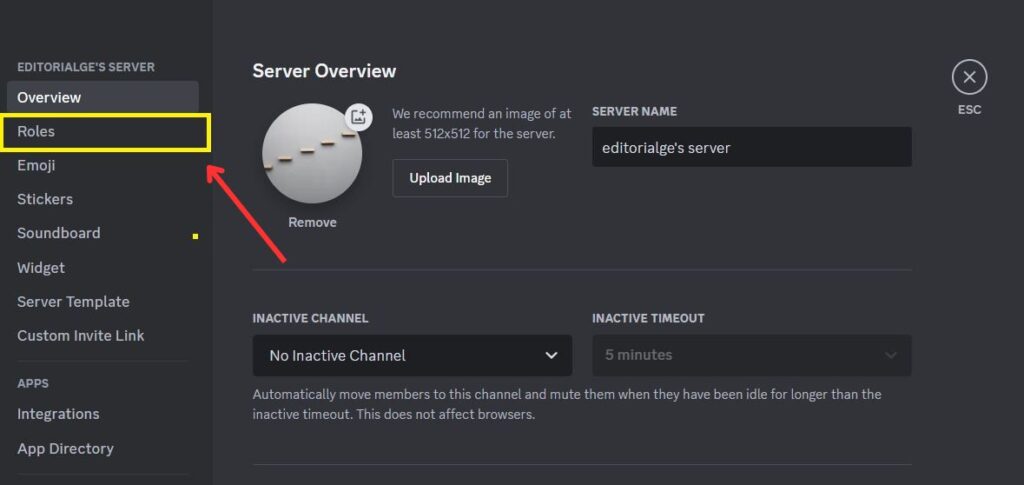
- Click on the “Roles” tab in the left sidebar.
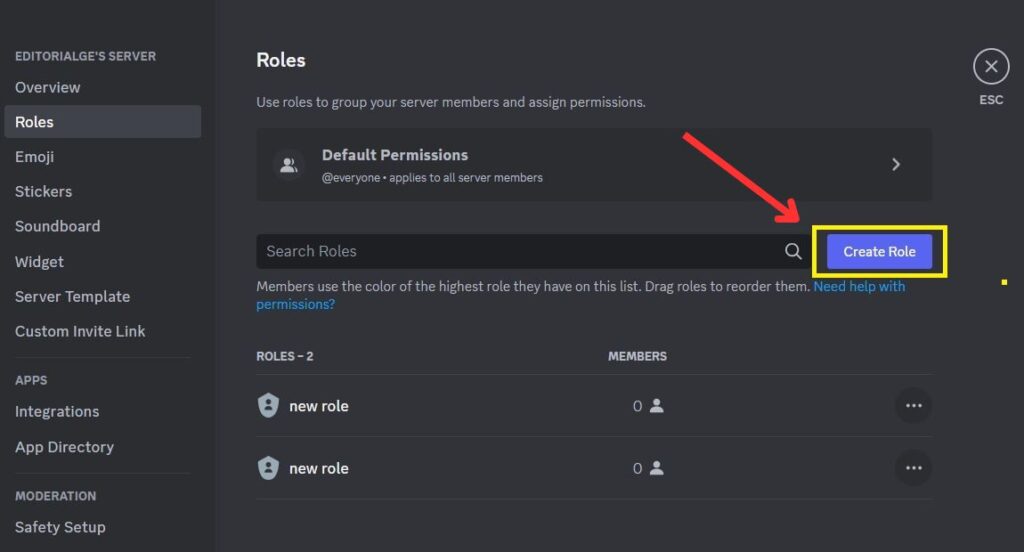
- Click on the “Create Role” button.
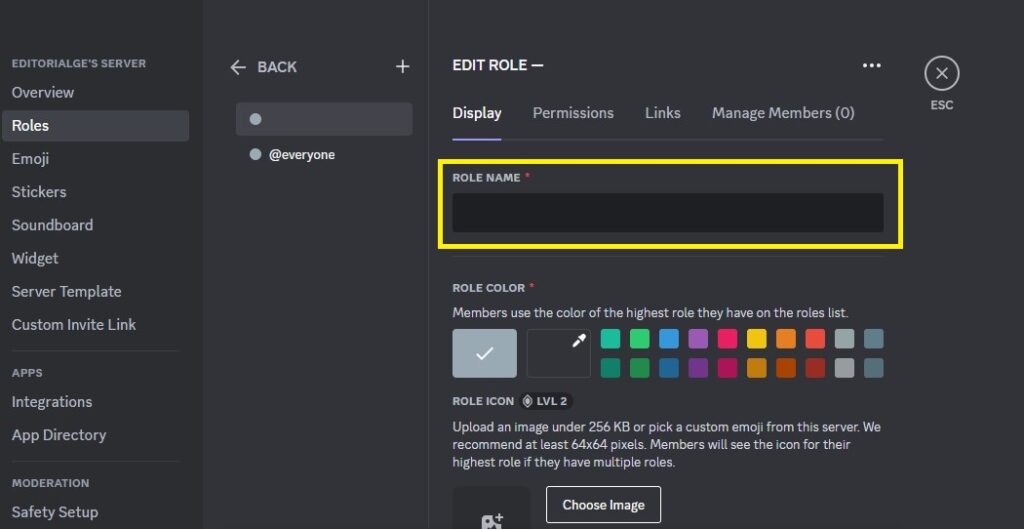
- Enter a name for the role in the “Role Name” field.
- (Optional) Select a color for the role in the “Color” field.
- (Optional) Select an icon for the role by clicking the “Icon” button and selecting an icon from the library.
- Click on the “Permissions” tab.
- Select the permissions that you want to give to the role.
- Click on the “Save Changes” button.
Once you have created the role, you can assign it to users by clicking on the user’s name and then clicking on the “Roles” tab. Select the role you want to assign the user, then click the “Add Role” button.
How to Create Roles in Discord By Using Windows?
Here are the steps on how to create roles in Discord using Windows:
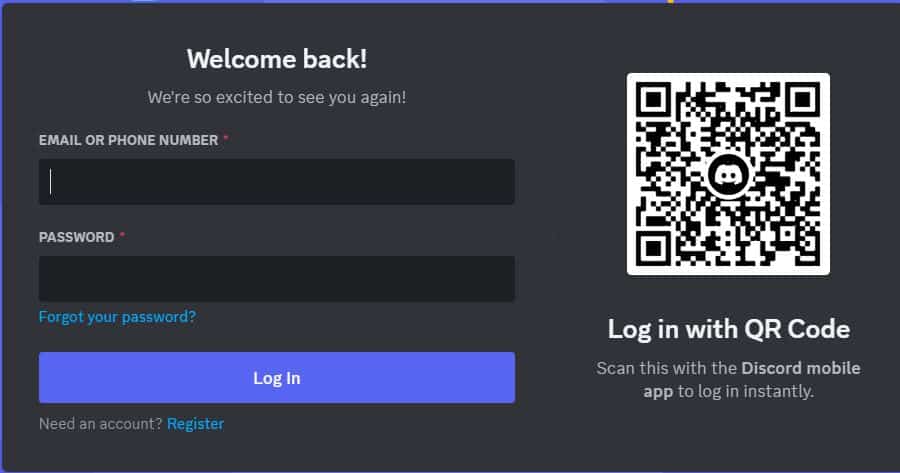
- Open Discord and log in to your account.
- Click on the server name in the top left corner of the window.
- Click on the “Server Settings” gear icon.
- Click on the “Roles” tab.
- Click on the “Create Role” button.
- Enter a name for the role.
- (Optional) Choose a color for the role.
- (Optional) Choose an icon for the role.
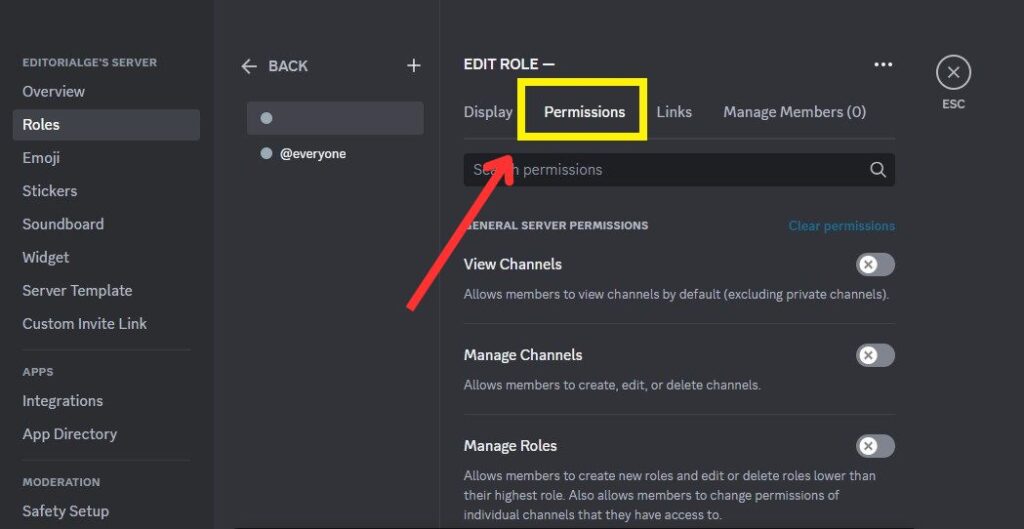
- Click on the “Permissions” tab.
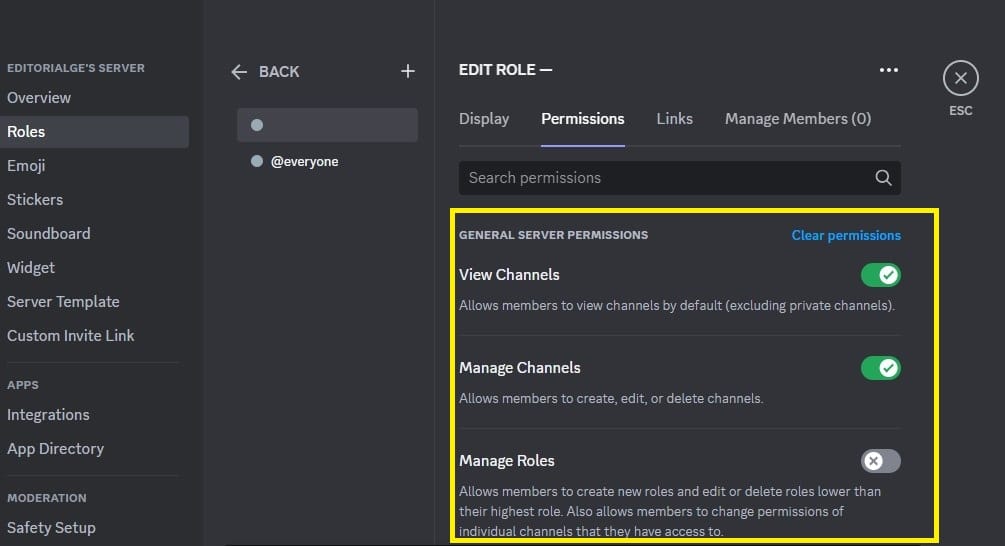
- Select the permissions that you want to give the role.
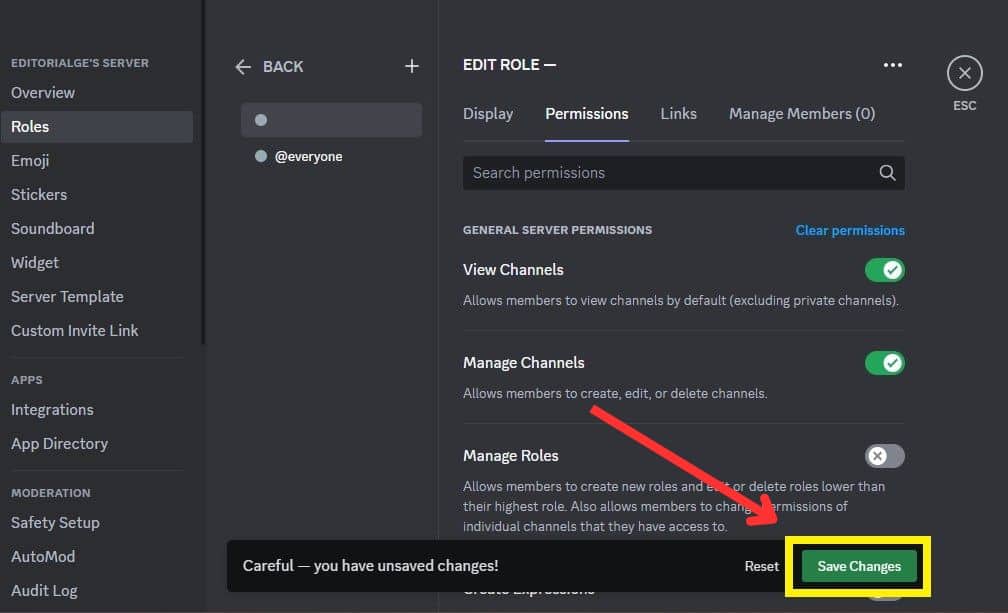
- Click on the “Save Changes” button.
Once you have created a role, you can assign it to users by clicking on the user’s name and then clicking on the role you want to assign.
You May Find Interest: How to Clear Discord Cache
How to Self-assign Roles in Discord?
Here are the steps on how to self-assign roles in Discord:
- Go to the server where you want to self-assign roles.
- Click on the server name in the top left corner of the screen.
- Click on “Server Settings” from the dropdown menu.
- Click on the “Roles” tab.
- Click on the “Create Role” button.
Give the role a name and select the permissions you want users to have when they have this role.
- Click on the “Create Role” button.
- Once the role has been created, you can add a reaction role. To do this, click on the “Reaction Roles” tab.
- Click on the “New Reaction Role” button.
- Select the role that you want to add a reaction role to.
- Select the emoji that you want to use as the reaction role.
- Click on the “Save” button.
Users can now self-assign the role by reacting to the message with their selected emoji.
Here are some additional tips for self-assigning roles in Discord:
- You can create multiple reaction roles for the same role. This can be useful if you want to allow users to choose from different levels of permissions for the role.
- You can also use reaction roles to allow users to self-assign temporary roles. This can be useful for things like events or games.
- To prevent users from self-assigning roles, you can disable the “Add Reactions” permission for the “Everyone” role.
Discord Role Ideas
There are many different Discord role ideas that you can use for your server. Here are a few examples:
- Administrative roles: These roles are for people with special permissions on the server, such as the ability to ban or kick members, create and manage channels, and edit server settings.
- Moderator roles: These roles are for people who help to keep the server running smoothly by enforcing the rules, resolving disputes, and removing spam and abusive content.
- Member roles: These roles are for everyone else on the server. They can be used to identify different groups of members, such as new members, veteran members, or members of a particular team or guild.
- Bot roles: These roles are for bots added to the server. They can be used to give Discord bots special permissions, such as sending messages in all channels or viewing private messages.
You can also create custom roles for your server. This can be a great way to add a personal touch to your server and to give members a sense of belonging. Some ideas for custom roles include:
- Role-playing roles: These roles can be used for role-playing games or other activities that require players to assume different identities.
- Event roles: These roles can identify members who have signed up for an event or completed a task.
- Achievement roles: These roles can reward members for their contributions to the server.
When creating roles for your server, it is crucial to consider the server’s purpose and its members’ needs. By carefully planning your roles, you can create a more organized and enjoyable experience for everyone.
Here are some additional tips for creating Discord roles:
- Give roles clear and concise names. This will help members to understand what each role is for.
- Use emojis or other symbols to make your roles more visually appealing. This can help to make your server look more organized and inviting.
- Set permissions for each role carefully. Only give members the licenses that they need to perform their duties.
- Keep your role structure simple. Too many roles can be confusing and difficult to manage.
- Be flexible and willing to change your role structure as needed. As your server grows and changes, you may need to add or remove roles.
Bonus Part: Troubleshooting Tips for Discord
You may experience problems while working with Discord. Therefore, we have added a bonus Discord troubleshooting tips for you.
Here are some Discord troubleshooting tips:
- Check your internet connection. If you’re having trouble connecting to Discord, ensure you have a strong internet connection. You can test your internet connection by visiting a website like speedtest.net.
- Restart your computer. Sometimes, a simple restart can fix problems with Discord.
- Reinstall Discord. If you’re still having problems, you can try reinstalling Discord. This will remove any corrupted files that may be causing the problem.
- Update your drivers. Ensure that your sound card and network adapter drivers are current. You can find the latest drivers for your devices on the manufacturer’s website.
- Disable firewalls and antivirus software. Firewalls and antivirus software can sometimes interfere with Discord. Try disabling them temporarily to see if that fixes the problem.
- Contact Discord support. If you’ve tried all of the above and are still having problems, contact Discord support for help.
Here are some additional tips for troubleshooting specific problems:
- If you’re having trouble hearing others in a voice chat, ensure your input and output devices are set correctly. You can do this by opening the Discord settings and going to the Voice & Video tab.
- If you’re having trouble speaking in a voice chat, ensure your microphone is connected correctly, and the input volume is turned up. You can also try disabling Push to Talk and see if that fixes the problem.
- If you’re having trouble connecting to a server, ensure the server is up and running. You can check the server status on the Discord website.
- If you’re having trouble with Discord’s overlay, ensure your game runs in fullscreen mode. You can also try disabling the overlay in the Discord settings.
Frequently Asked Questions on Discord Roles
Below, we have covered some commonly asked questions on Discord Roles. Check the answers if you have any queries.
How to assign roles in Discord with reactions?
- Go to the server settings and click on Roles.
- Create a new role or select an existing role.
- Click on the Permissions tab to enable the Read Messages and Add Reactions permissions.
- Go to the channel where you want to add the reaction roles.
- Type a message and then click on the Emoji icon.
- Select the emoji that you want to use for the reaction role.
- Press the spacebar and then type the name of the role.
- Click on the Create Reaction Role button.
How do I give myself a role in Discord without admin?
To create a new role in the server’s configuration, go to the Roles tab in the left-hand navigation. Here, you may give your role a name and specify its level of access to the server.
What is the Discord Role limit?
You can create Discord Roles for up to 250.
Is there a limit of 10 people on Discord?
Due to the unique coronavirus outbreak, Discord has increased the number of viewers for a live stream from 10 to 50. According to Discord CEO Jason Citron’s blog post, the decision was made after the firm heard how users were using the platform to cope with the difficulties brought on by the infection.
Wrapping Up
In this article, we have shown you how to create roles in Discord. Roles are a powerful way to organize your server and give users different permissions. By following the steps in this article, you can create roles that will help you to manage your server more effectively.
Subscribe to Our Latest Newsletter
To Read Our Exclusive Content, Sign up Now.$5/Monthly, $50/Yearly
Categories: HOW TO
Source: tit.edu.vn
![How to Create Roles in Discord? [Step-By-Step Image Guide] How to Create Roles in Discord? [Step-By-Step Image Guide]](https://vtt.edu.vn/wp-content/uploads/2023/06/How-to-Create-Roles-in-Discord-Step-By-Step-Image-Guide.jpg)
